


White balance refers to the process of balancing the color temperature of the lights in the location where you are shooting, so that the colors appear “normal.” Our eyes have the ability to adjust to these changes so quickly that we don’t even realize that certain lights give off different colors.
Most of the fi lm used in traditional fi lm photography was daylight balanced, meaning that the color in photos taken outdoors or with a fl ash looks correct. Another option, tungsten, balanced fi lm for indoor use. But anything beyond that had to be adjusted with colored fi lters to match the light. With the advances in digital photography, we are able to input any color temperature we want to balance the images with the surrounding light.
It’s extremely important to set the white balance in your images correctly, especially if you are shooting in JPEG mode. (With RAW images you can adjust the white balance in editing software, but the color information in a JPEG image is permanently embedded into the fi le, so trying to bring the image back to its correct color temperature is an impossible task.)
The 7D can perform this task automatically, and it usually does a pretty good job, but your goal should be to maintain as much control as possible with your images. You don’t need to have a deep understanding of color temperature to fi nd the correct white balance. Your camera comes with easy-to-understand presets, and even an option to customize or pre-set your white balance in the camera. Your white balance choices are:
- Auto: The default setting for your camera. It is also the setting used by all of the Automatic modes
- Daylight: Most often used for general daylight/sun-lit shooting.
- Shade: Used when working in shaded areas that are still using sunlight as the dominant light source.
- Cloudy, twilight, sunset: The choice for overcast or very cloudy days. This and the Shade setting will eliminate the blue colorcast from your images.
- Tungsten light: Used for any occasion when you are using regular household-type bulbs as your light source. Tungsten is a very warm light source and will result in a yellow/orange cast if you don’t correct for it.
- White fluorescent light: Used to get rid of the green-blue cast that can result from using regular fl uorescent lights as your dominant light source. Some fl uorescent lights are actually balanced for daylight, which would allow you to use the Daylight white balance setting.
- Flash: Used whenever you’re using the built-in fl ash or using a fl ash on the hot shoe. You should select this white balance to adjust for the slightly cooler light that comes from using a fl ash. (The hot shoe is the small bracket located on the top of your camera, resting just above the viewfi nder.)
- Custom: This setting gives you the option of photographing something that is pure white and using it as the baseline for your color temperature. The camera will balance its color temperature settings with that particular photograph.
- Color temperature: Here you have the option to actually dial in the Kelvin temperature that matches the light in your setting (from 2500-10,000).
SETTING THE WHITE BALANCE
- After turning on or waking the camera, select one of the shooting modes, such as P (you can’t choose anything other than Auto white balance when using either of the Fully Automatic modes).
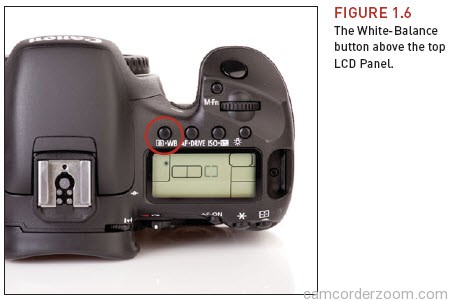
- Press the WB button on the top of the camera to bring up the white balance menu (Figure 1.6).
- Use the Quick Control dial to select the proper white balance for your shooting situation. The selected white balance icon will appear in the upper-left portion of the top LCD Panel.
- Press the Shutter button to lock in your selection.
- Check the camera display to ensure that the proper white balance is selected.
LIVE VIEW AND WHITE BALANCE
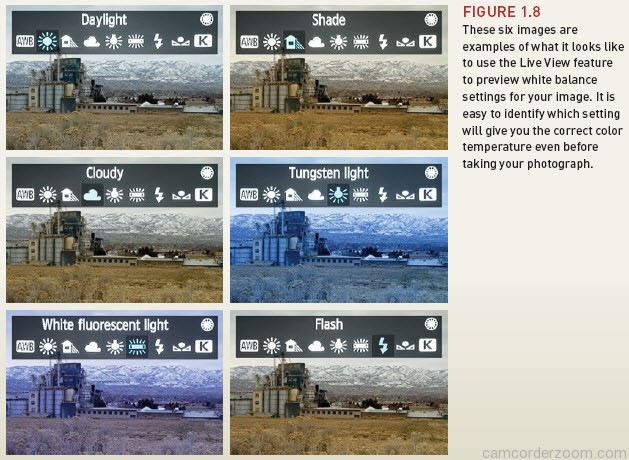
One really cool feature of the 7D is the ability to shoot in Live View. This feature can also come in handy when changing settings such as the white balance. To give it a try, make sure the Live View switch is set to the “white camera” position (Figure 1.7) and click on the Start/Stop button to activate Live View. Then follow the steps above to scroll through the different white balance settings. You will see an immediate change in the colors of your image as you set it on different white balance settings (Figure 1.8).

WHITE BALANCE AND THE TEMPERATURE OF COLOR
When you select different white balances in your camera, you will notice that underneath several of the choices is a number, for example, 5200K, 7000K, or 3200K. These numbers refer to the Kelvin temperature of the colors in the visible spectrum. The visible spectrum is the range of light that the human eye can see (think of a rainbow or the color
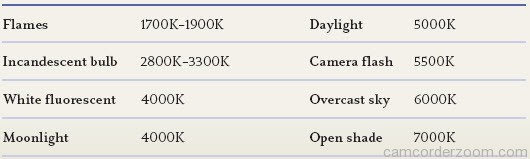
bands that come out of a prism). The visible spectrum of light has been placed into a scale called the Kelvin temperature scale, which identifies the thermodynamic temperature of a given color of light. Put simply, reds and yellows are “warm,” and greens and blues are “cool.” Even more confusing can be the actual temperature ratings. Warm temperatures are typically lower on the Kelvin scale, ranging from 3000 degrees to 5000 degrees, while cool temperatures run from 5500 degrees to around 10,000 degrees. Take a look at this list for an example of Kelvin temperature properties.
KELVIN TEMPERATURE PROPERTIES
The most important thing to remember here is how the color temperature of light will affect the look of your images. If something is “warm,” it will look reddish-yellow, and if something is “cool,” it will have a bluish cast.
A LITTLE COLOR THEORY
The visible spectrum of light is based on a principle called additive color, which involves three primary colors: red, green, and blue. When you add these colors together in equal parts, you get white light. By combining different amounts of them, you can achieve all the different colors of the visible spectrum. This is a completely different process than printing, where cyan, magenta, and yellow are combined to create various colors. This method is called subtractive color and has to do with the reflective properties of pigments or inks as they are combined.