Digital cameras are amazing because of the immediate feedback you get after taking a photo. You can make changes to the exposure and white balance and see the results on the LCD Monitor to instantly tell if you got the shot you wanted.
Your camera, out of the box, will have a very short review time—that is, when you take a photo and it shows up on the LCD Monitor, you will see it for only a few seconds. I like shots to stay on until I decide to keep shooting or turn off the camera,
so I have it set to the Hold setting. This setting allows you to review the image you photographed for as long as you like (lightly pressing the Shutter button will get you back into shooting mode and turn off the LCD Monitor). Note that this option will drain your batteries faster than the default setting.
CHANGING YOUR REVIEW TIME SETTING
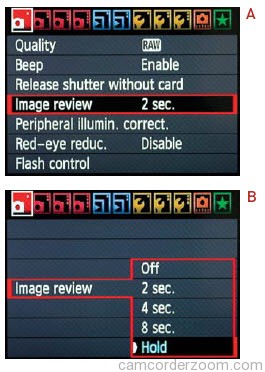
- Press the Menu button and use the Main dial to select the leftmost menu tab.
- Using the Quick Control dial, scroll down to Image Review and press the Set button (A).
- Scroll down to Hold (or whatever setting you prefer) and then press the Set button once again (B). (If you don’t
want the LCD Monitor to show an image after each shot, then just set the review time to OFF.) - Press the Menu button to leave the menus and continue shooting.
Now that you have the image display set, let’s check out some of the other visual information that will really help you when shooting.
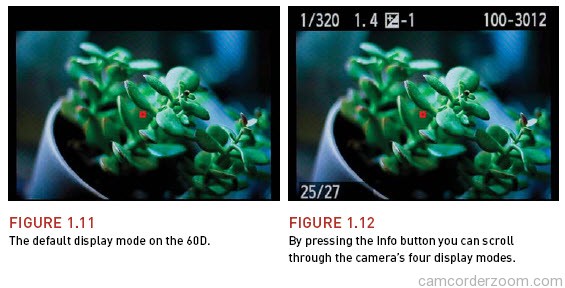
When you press the Playback button on the back of the camera, you will see the default screen, which shows only the image and no information (Figure 1.11).
If you press the Info button while in the default playback screen, then you will see basic information on your image, such as shutter speed, aperture, exposure compensation, and image number (Figure 1.12).
The third display, which appears after you press the Info button again, will take you to the Shooting Information Display. This shows you more details, such as your white balance, camera mode, and file size, and offers more information about your image than any of the other display settings (Figure 1.13).
The last display will give you detailed histogram information (Figure 1.14). This is useful if you need to see each individual color channel, but I find that the basic histogram display in the Shooting Information Display is sufficient for most images.

If you prefer one display mode to another, press the Info button until you reach the display mode you like best; if you leave it in that mode, you will see your images in that display mode every time you press the Playback button. I usually use the default display (Single Image Display) and will sometimes click through the display modes if I need to view more information about a specific shot.
THE VALUE OF THE HISTOGRAM
Simply put, histograms are two-dimensional representations of your images in graph form. There are two different histograms that you should be concerned with: the luminance and the color histograms. Luminance is referred to in your manual as “brightness” and is most valuable when evaluating your exposures. In Figure 1.15, you see what looks like a mountain range. The graph represents the entire tonal range that your camera can capture, from the whitest whites to the blackest blacks. The left side represents black, all the way to the right side, which represents white. The heights of the peaks represent the number of pixels that contain those luminance levels (a tall peak in the middle means your image contains a large amount of medium-bright pixels). Looking at this figure, I can see that the largest peak of the graph is in the middle and trails off as it reaches the edges. In most cases, you would look for this type of histogram, indicating that you captured the entire range of tones, from dark to light, in your image. Knowing that is fine, but here is where the information really gets useful.
When you evaluate the histogram that has a spike or peak riding up the far left or right side of the graph, it means that you are clipping detail from your image. In essence, you are trying to record values that are either too dark or too light for your sensor to accurately record. This is usually an indication of over- or underexposure. It also means that you need to correct your exposure so that the important details will not record as solid black or white pixels (which is what happens when clipping occurs). There are times, however, when some clipping is acceptable. If you are photographing a scene where the sun will be in the frame, you can expect to get some clipping because the sun is just too bright to hold any detail. Likewise, if you are shooting something that has true blacks in it—think coal in a mineshaft at midnight—there are most certainly going to be some true blacks with no detail in your shot.

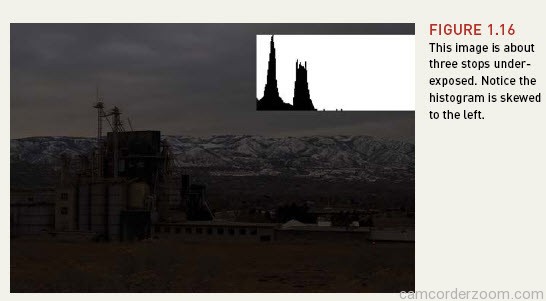
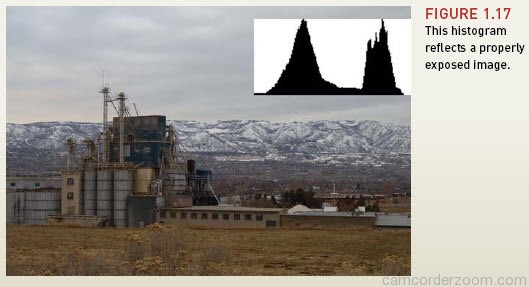
The main goal is to ensure that you aren’t clipping any “important” visual information, and that is achieved by keeping an eye on your histogram. Take a look at Figure 1.16. The histogram displayed on the image shows a heavy skew toward the left with almost no part of the mountain touching the right side. This is a good example of what an underexposed image
histogram looks like. Now look at Figure 1.17 and compare the histogram for the image that was correctly exposed. Notice that even though there are two distinct peaks on the graph, there is an even distribution across the entire histogram.
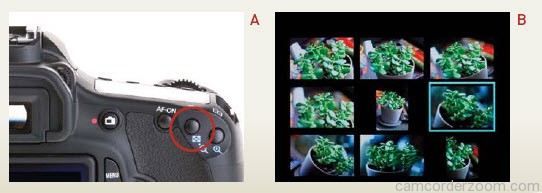
INDEX DISPLAY
If you prefer to view your images quickly and more than one at a time, you have the option of viewing them in Index Display. To do this while in review mode, just press the Index button a few times (A) and you can view up to nine images at a time (B). To view any image up close, just highlight it, press the Set button, and it will bring you back to the default display mode.