


The 60D has two basic “zones” to set your shooting mode to—Basic and Creative. The Basic Zone is a group of settings that give the camera full
control of most settings, whereas the Creative Zone has the more advanced shooting modes that will give you more control over the camera and your images. In this section, I will list all of the Basic Zone shooting modes, explain what the camera controls versus what you can control, and show you when it’s best to use the various modes.
SETTING UP AND SHOOTING IN THE BASIC ZONE
- Turn your camera on and, while pressing down on the Mode dial lock-release button, turn the Mode dial to align one of the eight shooting modes with the indicator line.
- Make sure your preferred image-quality setting is selected
- To make changes to the settings, press the Q button on the back of the camera and use the Multi-Controller to scroll through the options.
- Point the camera at your subject and press the Shutter button to take a photo. The camera will determine its settings based on the shooting mode you have selected.
FULLY AUTOMATIC MODE
Full Auto mode, indicated on the Mode dial by a green square, is exactly what it sounds like—fully automatic shooting. This means that the camera decides all of your in-camera settings. It chooses the ISO, shutter speed, aperture, white balance, and whether or not you will use the built-in flash. You only have control over the quality settings (RAW or JPEG) and drive mode setting (where you can choose between single or self-timer shooting). Because this mode allows you very little control over your camera settings, it’s best to use it sparingly.
DISABLING FLASH MODE
There may be times when you want to shoot in the Fully Automatic mode but are unable to use your flash, such as when you are indoors at an event that prohibits flash photography, or perhaps when at a museum. This mode is identical to the Fully Automatic mode except that it completely disables the use of the 60D’s built-in flash.
CA: CREATIVE AUTO MODE
One good alternative for new photographers is to start out in the Creative Auto (CA) mode. It’s very similar to Full Auto, so it’s something you might want to use in moderation, but you do have a bit more control over some of the settings. You have the ability to change the
drive mode, flash, ambience setting, and the blurriness of the background in each image, along with your quality setting (RAW or JPEG). The camera will decide the rest for you. It’s a good option if you know what you want your image to look like but are still not familiar with how aperture and shutter speed function to properly expose your image.
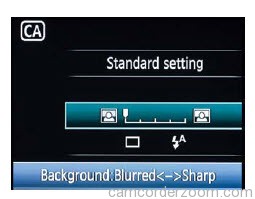
One feature that is unique to the CA mode is the ability to control the blurriness of the background (Figure 3.1). This setting tells the camera where to set the aperture so you get the effect you want to see. (Note that the background-blur function will be disabled when the built-in flash is popped up. To re-enable this function and adjust its setting, just push the flash back into the camera, change your settings, and then continue shooting.)
AMBIENCE SETTING
The Ambience setting is a feature you are able to select in all of the Basic Zone shooting modes except for the Fully Automatic and Disable Flash modes. These settings affect the color intensity of your image and are permanently embedded into your image when shooting in JPEG quality (using the RAW format will allow you to change and manipulate your image in post-processing without loss of quality).
MENU ITEMS IN THE BASIC ZONE
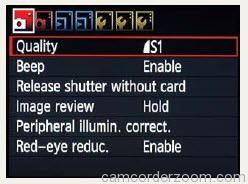
One important detail to know when using the Full Auto and Creative Auto modes is that your menu tabs are limited. Only seven out of the eleven tabs that are normally visible when shooting in all other mode settings will display (Figure 3.2). Since the camera decides the majority of the exposure and color settings when in the fully automatic modes, the information in some menu tabs is not necessary.
PORTRAIT MODE
The Portrait shooting mode blurs the background by opening the aperture wide, and also gives skin tone a warmer and softer look than the Full Auto mode. If there’s not enough light on your subject, then the built-in flash will pop up automatically. You have control over the image quality (RAW or JPEG), ambience setting, drive mode (low-speed continuous or self-timer), and white balance (a.k.a. lighting/scene type). This mode is best used when photographing people.
LANDSCAPE MODE
The Landscape shooting mode is for photographing wide scenes, nighttime scenes, or any time you want the majority of your image in focus. This mode will default to using a smaller aperture for greater depth of field, and it also enhances the color saturation of the greens and blues in your images. You have control over the image quality (RAW or JPEG), ambience setting, drive mode (single shooting or self-timer), and white balance (a.k.a. lighting/scene type). When using this mode, the built-in flash is disabled.
CLOSE-UP MODE
Use the Close-up mode when getting in close to your subject—for example, when photographing flowers or small objects, or when using a macro lens. The settings will default to using a wide aperture for shallow depth of field to make the background look blurry, and the built-in flash will also pop up automatically if the scene is too dark. You can control the image quality (RAW or JPEG), ambience setting, drive mode (single shooting or self-timer), and white balance (a.k.a. lighting/scene type).
SPORTS MODE
The Sports mode is for when you want to photograph a moving subject, such as a child playing sports, an active pet, or a moving vehicle. The settings will default to using a fast shutter speed to “freeze” the action and will continually try to find focus if you keep the Shutter button half-pressed (or when pressing the AF-ON button). You have control over the image quality (RAW or JPEG), ambience setting, drive mode (High-speed continuous shooting or self-timer), and white balance (a.k.a. lighting/scene type).
NIGHT PORTRAIT MODE
The Night Portrait mode is for photographing people at night or in a darkened room. This differs from the Portrait mode because it keeps the shutter open longer to allow the darker background to show up in the image and appear more natural. You will be using the built-in flash the majority of the time, since this mode will typically be used in low-light environments. You have control over the image quality (RAW or JPEG), ambience setting, and drive mode (single shooting or self-timer).
MY ADVICE ON USING THE BASIC ZONE
The Basic Zone gives the camera a lot of control over the settings while you, the photographer, are creating images. New photographers who are still learning the ins and outs of the technical side of photography and their camera may find these settings useful, but using these modes basically reverts your camera to a glorified point-and-shoot camera set to automatic. Chances are that if you’re reading this book, you want to take your photography a step further, and if you’re only using the modes in the Basic Zone, you may find that over time you’re not achieving the image results you want.
Now, there’s absolutely nothing wrong with using the modes in the Basic Zone, and I’m not going to tell you that you shouldn’t use them. However, if you haven’t yet strayed from the Basic Zone, I would like to challenge and encourage you to try using the shooting modes in the Creative Zone (listed in the next section of this chapter). Taking more control over your camera will help you gain a deeper understanding of how depth of field, light, and the exposure triangle work together to create those amazing images you’ve probably already visualized in your mind.