


The following two sections, covering panoramas and high dynamic range (HDR) images, require you to use image-processing software to complete the photograph. However, if you want to shoot for success, it’s important that you know how to use these two popular techniques.
SHOOTING PANORAMAS
Sometimes you’ll be in a location that is simply too big to cover within the typical camera frame. In these cases, you might consider photographing a panorama. You could always take a photo and crop off the top and bottom, making a “fake” panorama, but the purpose of a panorama image is to photograph an extended view of a scene, with minimal distortion, that can’t typically be created with one shot.
If you want to make a true panorama, you either need a special camera that can move on its own to seamlessly photograph a scene, or you can use the following method to achieve similar results (Figures 5.20 and 5.21). You’ll photograph a series of side-by-side images and stitch them together using editing software to produce one elongated panoramic shot.
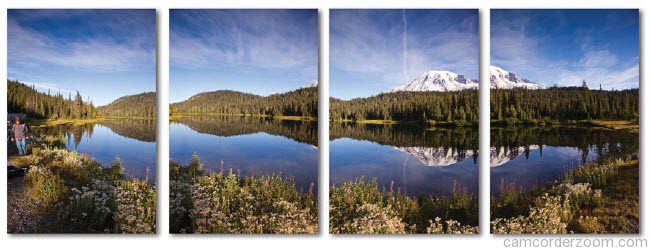
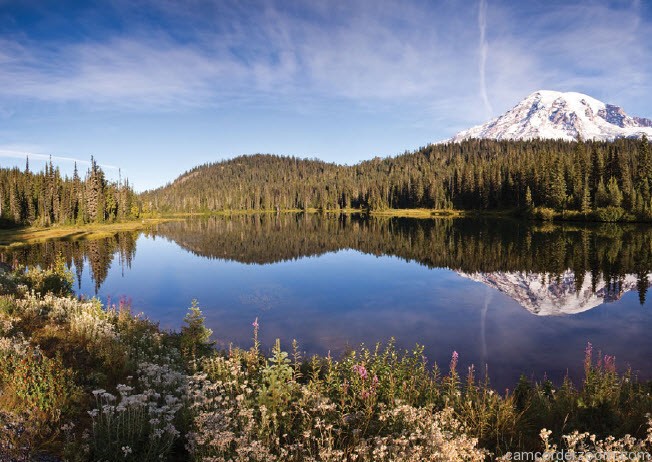
I won’t get into details on how to edit the photographs, but if you have the proper software, such as Adobe Photoshop, the best thing you can do is learn how to photograph the images in a way that will make stitching them together a piece of cake.
SHOOTING FOR A MULTIPLE-IMAGE PANORAMA
- Mount your camera on your tripod vertically and make sure it is level. (Shooting vertically will give your panorama more height and therefore more image detail.)
- Choose a focal length for your lens that is between 35mm and 50mm.
- In Av mode, use a very small aperture for the greatest depth of fi eld. Take a meter reading of a bright part of the scene, and make note of it.
- Now change your camera to Manual mode (M), and dial in the aperture and shutter speed that you obtained in the previous step.
- Set your lens to manual focus, and then set your focus by fi nding a point onethird of the way into the scene. (If you use autofocus, you risk getting different points of focus from image to image, which will make the image stitching more diffi cult for the software.)
- While carefully panning your camera, shoot your images to cover the entire area of the scene from one end to the other, leaving a 30 percent overlap from one frame to the next.
SORTING YOUR PANORAMIC IMAGES
Pulling panorama images into your editing software can sometimes be confusing because you’re not sure where one series of images ends and another begins. Here’s a quick tip for sorting your images.
When you’re all set up and ready to start shooting your panorama, hold up one finger in front of the lens and take a quick shot. Then start your panorama shots. After you’ve photographed the last image, hold up two fingers in front of the lens and take another photo. This will help you find where each series begins and ends and should make it easier to sort and edit your panoramas.
SHOOTING HIGH DYNAMIC RANGE (HDR) IMAGES
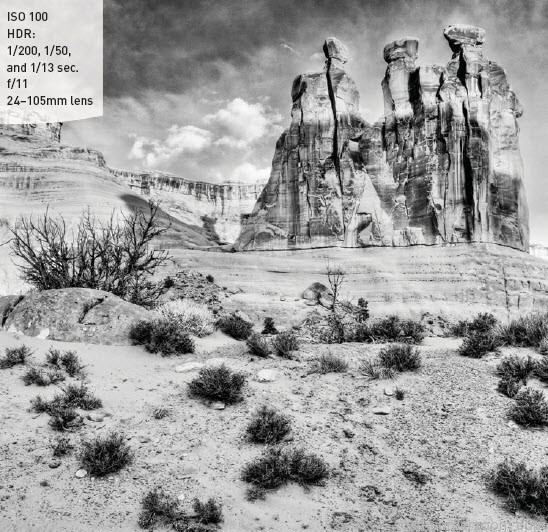
A fun and popular way to create images is through a technique called high dynamic range (HDR). When you create an image that has a wide range of tones (shadows and highlights), such as a landscape image with a very bright sky, you need to decide what areas you want to emphasize and adjust your exposure to match. We can often fi nd an exposure that is a balance between overexposing the sky and underexposing the ground. HDR photography allows you to photograph several different exposures of the same scene, capturing the shadows, midtones, and highlights, and then combine them to create a single image in editing software (Figures 5.22, 5.23, and 5.24). For photographers who want to do some serious HDR shooting, I recommend using Adobe Photoshop or HDRsoft’s Photomatix Pro. I’m not going to get into the details of how to edit your image, but I will walk you through the steps to set up your camera and create the photographs for HDR.


Note that it’s absolutely necessary to use a tripod when using this technique because all the images must be aligned perfectly to combine them during the editing process.
The fi rst step is to set your camera to automatically bracket your exposures. You will want one image that is underexposed, one that is overexposed, and one that is right in the middle. The 7D allows you to set this up so that it automatically photographs a series of three shots with each of those exposures.
SETTING UP AUTO EXPOSURE BRACKET (AEB) MODE FOR HDR
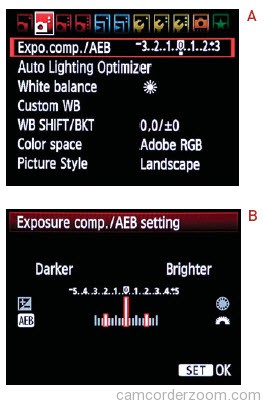
- Press the Menu button and use the Main dial to get to the second shooting tab, and then use the Quick Control dial to highlight the Expo. Comp./AEB item (A). Press the Set button.
- Scroll the Main dial to the right until the exposures are set to two stops between each shot (-2, 0, +2) (B). Then
press the Set button. (Note that this setting will remain in place until you change it or turn off your camera. To set it back to normal, just scroll the Main dial to the left until only the center line is highlighted in red.) - Press the Menu button and then press the AF-DRIVE button on the top of your camera. Use the Quick Control dial to select High-speed continuous shooting mode. (This will allow you to photograph your three bracketed images very quickly. This is important because some things in your image may be moving, such as clouds or leaves.)
Now that Auto Exposure Bracket mode is set up, let’s go through the steps to create photographs for an HDR image.
SETTING UP FOR SHOOTING AN HDR IMAGE
Mount your camera on your tripod and then set your ISO to 100 to ensure clean, noise-free images.
- Set your program mode to Av. During the shooting process, you will be taking three shots of the same scene, creating an overexposed image, an underexposed image, and a normal exposure. Since the camera is going to be adjusting the exposure, you want it to make changes to the shutter speed, not the aperture, so that your depth of fi eld is consistent.
- Set your camera fi le format to RAW. This is extremely important because the RAW format contains a much larger range of exposure values than a JPEG fi le, and the HDR software needs all of this information.
- Focus the camera manually using the focus method discussed earlier in the chapter, compose your shot, secure the tripod, and hold down the Shutter button until the camera has fi red three consecutive times.
- Download the images to your computer and create the HDR image using specialized editing software.
BRACKETING YOUR EXPOSURES
In HDR, bracketing is the process of capturing a series of exposures at different stop intervals. You can bracket your exposures even if you aren’t going to be using HDR. Sometimes this is helpful when you have a tricky lighting situation and you want to ensure that you have just the right exposure to capture the look you’re after. In HDR, you bracket to the plus and minus side of a “normal” exposure, but you can also bracket all of your exposures to the over or under side of normal. It all depends on what you are trying to do. If you aren’t sure whether you are getting enough shadow detail, you can bracket a little toward the overexposed side. If you aren’t sure you’re getting enough detail in your highlights, bracket a little toward the underexposed side. You can bracket in increments as small as a third of a stop. This means that you can capture several images with very subtle exposure variances and then decide later which one is best.