


Photography is all about capturing light, so the most important thing in all of your images is the quality of the light on your subject. When you photograph people, you typically have a lot of control over when and where the image is taken, so you can manipulate your environment and fi nd the best possible light for your subject.
Before I get into what you should do, let me fi rst talk about what not to do. It’s a common misconception that bright sunlight is great for portrait photographs. Of course, this is not entirely untrue, since there are some creative and amazing ways to use harsh natural sunlight and make great portraits. The problem is that when the sun is at its highest point, in the middle of the day, it’s going to cast some very harsh shadows on your subject and probably make them squinty-eyed as well.
There are several easy ways to achieve beautifully lit portraits in an outdoors setting, and here are my two favorites. The fi rst is to fi nd shade. It might not seem like it at fi rst, but on a sunny day an extraordinary amount of light fi lls shaded areas, for example, on the side of a building or underneath a covered patio. This light is diffused sunlight and will give a very soft, even light on your subject’s face (Figure 4.3).
The second way to light your images outdoors is to use the light that occurs during the “golden hour” of the day. This is the time period that occurs one hour after sunrise and one hour before sunset (many photographers are more likely to use the evening light since it’s more convenient). The quality of this light is soft, warm-toned, and very pleasing for portraits.
WHEN TO USE THE POP-UP FLASH
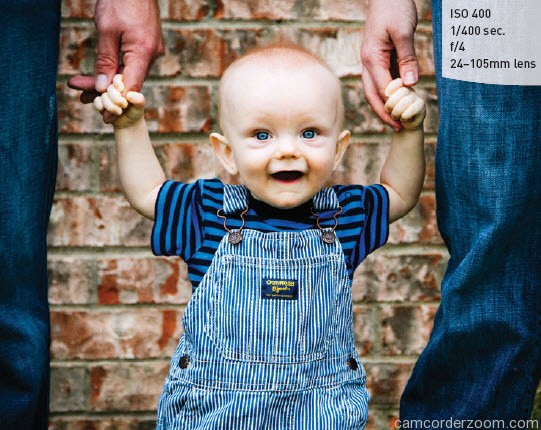
I’m not usually a big fan of using the pop-up fl ash or any type of on-axis fl ash, which is a light source that comes from the same direction as the camera. It usually results in lighting that is very fl at, and often adds harsh shadows behind the subject. But you won’t always have the perfect lighting situation for each photograph, so keeping an on-camera ready-to-go fl ash on-hand can be very practical. It’s also good for
those moments when you just have to get the shot and there’s not a lot of light available, for example, if your baby takes his or her fi rst steps in a dark room. You wouldn’t want to miss that, and the pop-up fl ash is a handy tool to help capture those moments.
The fl ash can also be useful if you are in a situation where the afternoon sunlight is the only light available and you need to use a fi ll light. A fi ll light will “fi ll in” the areas in your subject that are not already lit by the main light, in this case the sun. When photographing people outdoors in the direct sunlight, you don’t want them to face directly into the light. Try to position your subject so the sun is off to their
side or behind them. This is a good situation in which to use a fi ll light, such as the pop-up fl ash on your 7D, to properly expose their face (Figure 4.4).
SETTING UP AND SHOOTING WITH FILL FLASH

- Press the Flash button to raise your pop-up fl ash into the ready position (A).
- Press the ISO/Flash Exposure Compensation button (B).
- Turn the Quick Control dial to change the fl ash exposure (this is similar to exposure compensation, but you are only affecting the amount of light that your fl ash will generate for each shot).
- Take a photograph and check your LCD Monitor to see if it looks good. If not, try increasing or reducing the fl ash meter in one-third-stop increments until you get the correct amount of fi ll-fl ash for your shot.
There are other options for fi lling in areas of your image that need additional light. A refl ector is a very common and inexpensive accessory that you can use to bounce light back onto your subject (Figure 4.5). You can buy these at any camera store, but you could even use a large piece of white foam core or anything that is refl ective (like a sun shade for the windshield of your car) to get similar results.
METERING MODE FOR PORTRAITS
Your camera gives you four different metering modes that tell it where and how to meter the light. Each mode has a unique way of reading the scene, and which mode you use will depend on the environment you are shooting in.
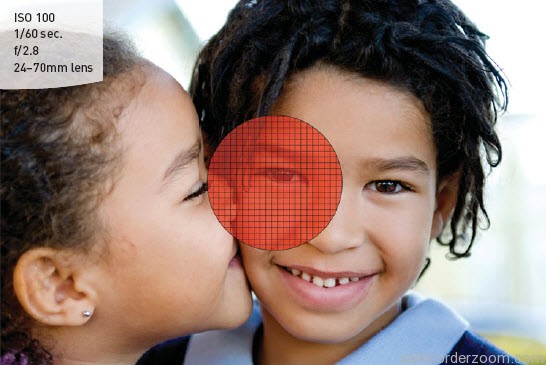
I use the Evaluative metering mode for the majority of my work, and this mode is ideal for portraits. However, sometimes you’ll run into situations where the background is much darker or lighter than the person you are photographing, which could give you an incorrect exposure. In these cases you’ll want to use Partial metering, which will meter a smaller portion of the center of the frame (Figure 4.6). The great thing about digital SLRs is that with instant feedback on the LCD, you are able to make adjustments as needed if the metering mode didn’t measure the light properly.
SHOOTING WITH THE AE LOCK FEATURE
Once you select your metering, you can lock that setting in your camera temporarily if you want to recompose your image—for example, if you are in an environment where there is suffi cient light on your subject but the background is signifi cantly brighter or darker. The metering in your camera is continuous, meaning it will change depending on where the center of the viewfi nder is pointed. If you have composed the image so that the person is off-center, the camera will meter the wrong part of the scene.
To correct this, you can meter for one part of the image (your subject), lock those settings down so they don’t change, and then recompose the scene and take your photo. Here’s how to use the AE Lock feature on the 7D:
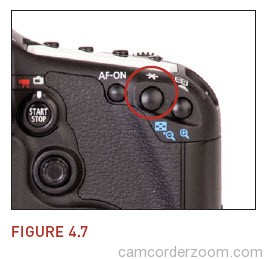
- Find the AE Lock button on the back of the camera and place your thumb on it (Figure 4.7).
- While looking through the viewfinder, place the center focus point on your subject.
- Press and hold the AE Lock button to get a meter reading.
- Recompose your shot, and then take the photo.
- To take more than one photo without having to take another meter reading, just hold down the AE Lock button until you are done using the meter setting.