When photographing people it can be easy to get carried away with focusing on their expressions and checking your exposure, but it’s always crucial to consider how the photo is composed. The placement of the person, as well as the perspective and angle you are using, can make or break the shot. Here are a few simple tips to help you create some amazing portrait compositions.
RULE OF THIRDS
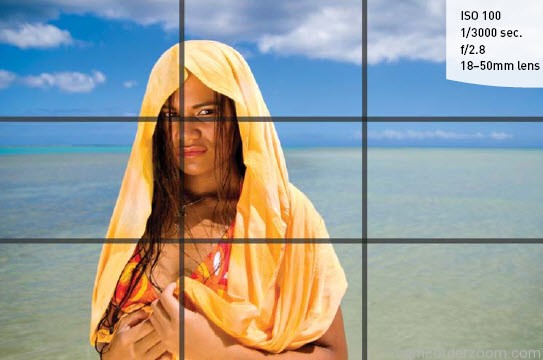
One of the most basic rules of composition, the “rule of thirds,” is a very good principle to stick with when photographing people. It states that you should place the subject of your photograph on a “third-line” within the frame of your viewfinder. Imagine a tic-tac-toe board, with two lines spaced evenly down the center of the frame both horizontally and vertically (Figure 4.11). Your goal is to place the subject on one of the intersecting lines—you’re basically trying to keep the person off-center without pushing them too close to the edge of the frame.
Another thing to keep in mind is that you want to fill the frame as much as possible with your subject. This doesn’t mean that you should get in so close that you have nothing in the shot but their face, but rather that you should be close enough so that you aren’t adding anything to the image that you don’t want to see. This is usually done by sticking to the third-line principle of framing the head near the top third of the frame. When I hand my camera to someone else to take my photo, I always chuckle to myself when I look at the image afterwards and my head is completely centered in the frame. I usually just go into editing software and crop out the excess headroom, making it look like it was properly composed. However, it’s much easier and more efficient to do as much of the work in-camera as possible.
The great thing about the 60D is that you can add a grid overlay to your LCD Monitor when shooting in Live View to help you with the composition.
SETTING UP THE GRID DISPLAY FOR LIVE VIEW SHOOTING

- Press the Menu button and go to the fourth shooting menu tab (fourth tab from the left).
- Use the Quick Control dial and scroll down to the menu item labeled Grid Display (A).
- Press the Set button and select Grid 1 (B). I prefer this grid because it clearly shows the third-lines on the frame.
Press the Set button to lock in this change. - Next, press the Live View shooting button, located on the back of your camera, and you’ll see a grid overlay on
your LCD Monitor.
PERSPECTIVE
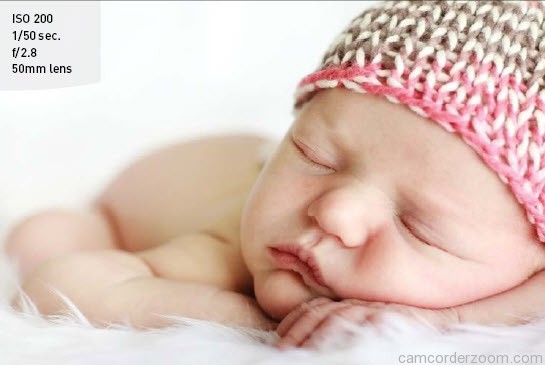
When shooting with your 60D, it’s very easy to take all of your images from a standing position. This of course will vary in height from person to person, but so will the people you are photographing. I usually carry a small stepladder with me when I go on location so I can vary my height with the people I’m photographing, especially since I’m shorter than most other people. The basic rule to follow is to try to stay eye level with your subject, which could mean flopping down on your belly to photograph a child or baby (Figure 4.12).
Another technique I like to use is to shoot my photos three different ways—vertical, horizontal, and slanted. I will often do one of each with the subject I’m photographing, and these are all very good ways to angle your camera for portraits. Sometimes you don’t realize what will make a pleasing image until you try it out, so it’s good to experiment a little bit to see what works best. My favorite angle to shoot at is a slanted angle, also referred to as “Dutch angle” (Figure 4.13). I find that doing this gives my images a sense of motion and uniqueness, since our eyes want to see things straight up and down.

BREAK THE RULES!
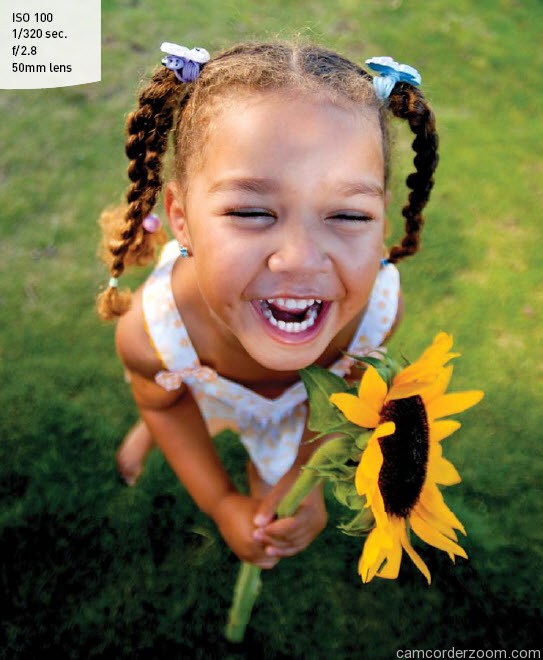
So now that I’ve given you all of these great rules to follow when composing your image, the last rule I’m going to tell you is to break all of them! Don’t think that you always need to keep an image off-center or that you have to photograph children at their level all the time (Figure 4.14). Experiment and find new ways to capture your images—you just might find that breaking the rules was the best thing you could have done for your image.
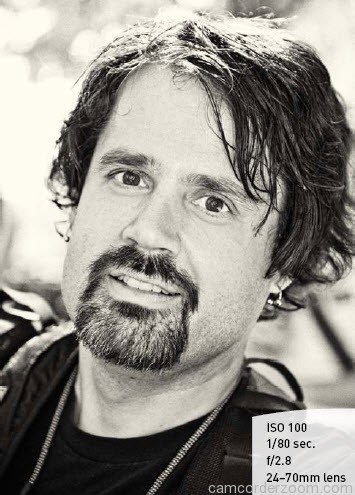
BEAUTIFUL BLACK AND WHITE PORTRAITS
Sometimes a portrait just looks better in black and white—we see more of the person and their expression rather than their surroundings or the color of their clothing (Figure 4.15). You can change the picture style to Monochrome in your camera so that you are photographing the image in black and white, but when you do this, you are only giving yourself
one option. If you decide you liked it better in color, you have no way to change it back.
I prefer to do all of my black and white conversions while editing the photo on my computer, and I encourage you to do the same. You can make black and white conversions, along with many other types of adjustments to your images, by using the Canon Digital Photo Professional software on the disc included with your camera.