


Your G12 has a number of image quality settings to choose from, and depending on your needs, you can adjust them accordingly. Most people shoot with the JPEG option because it allows them to capture a large number of photos on their memory cards. The problem is that unless you understand what JPEG is, you might be degrading the quality of your images without realizing it.
The JPEG format has been around since about 1994 and stands for Joint Photographic Experts Group. JPEG was developed by this group as a method of shrinking the size of digital images down to a smaller size for the purpose of reducing large file sizes while retaining the original image information. (Technically, JPEG isn’t even a file format— it’s a mathematical equation for reducing image file sizes—but to keep things simple, I’ll just refer to it as a file format.) The problem with JPEG is that, in order to reduce a file size, it has to throw away some of the information, a technique referred to as “lossy compression.” This is important to understand because, while you can fit more images on your memory card by choosing a lower-quality JPEG setting, you will also be reducing the quality of your image. This quality reduction becomes more apparent as you enlarge your pictures.
The JPEG file format also has one other characteristic: To apply the compression to the image before final storage on your memory card, the camera has to apply all the image processing first. Image processing involves such factors as sharpening, color adjustment, contrast adjustment, noise reduction, and so on. Many photographers now prefer to use the RAW file format to get greater control over their image processing.
The G12 has eight quality settings for the JPEG format: two settings each for the Large (L), Medium 1 (M1), Medium 2 (M2), and Small (S) settings. The two settings—Fine and Normal—represent more or less image compression based on your choice. I recommend working with the highest-quality setting possible. After all, the goal is to make big, beautiful photographs, so why cripple the process from the start with lowerquality images?
Setting the image quality
- Press the Function/Set (FUNC./SET) button at the center of the Control dial to bring up the Function menu along the left side of the LCD.
- Use the Down button to navigate to the Image Type setting. If it already reads JPEG in the menu, skip to Step 4.
- Use the Right button to select the JPEG image type.
- Next, use the Down button to navigate to the Quality setting at the bottom of the menu.
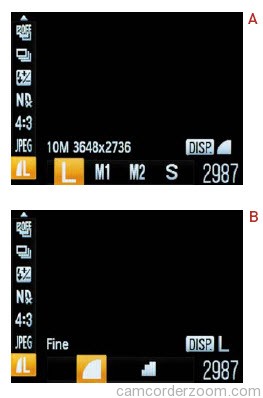
- Use the Right button to select the Large (L) setting (A).
- To set the compression amount, press the Display (DISP.) button to bring up the Compression setting options.
- Select the Fine setting (B), then press the Function/Set button.
As you will see when scrolling through these settings—by looking at the number at the bottom right on the LCD—the higher the quality, the fewer pictures you will be able to fit on your card. Always try to choose quality over quantity. Your pictures will be the better for it.
The G12 includes one more setting related to image quality: Aspect Ratio, which defines the shape of the frame. Five aspect ratios are available (C). For example, if you plan to shoot HD video with the G12 and want still photos to match the same frame size, choose the 16:9 setting.
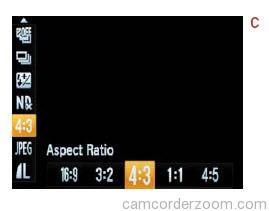
That said, I recommend sticking with the default 4:3 aspect ratio, which takes advantage of the full surface of the G12’s
image sensor. You can always crop to a different size on your computer. Shooting in something like the 1:1 aspect ratio, which is a square, omits areas to the left and right of the frame—you never know, the most interesting part of a shot could happen at the edges, and you’d miss it!