


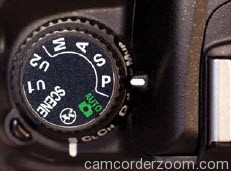
I think of Program mode as a good place to begin for those graduating from the automatic or scene modes (Figure 4.1). There is a reason that Program mode is only one click away from the automatic modes: With respect to apertures and shutter speeds, the camera is doing most of the thinking for you. So if that is the case, why even bother with Program mode?
First, let me say that I rarely use Program mode because it just doesn’t give as much control over the image-making process as the other professional modes. There are occasions, however, when it comes in handy, like when I am shooting in widely changing lighting conditions and I don’t have the time to think through all of my options, or I’m not very concerned with having ultimate control of the scene. Think of a picnic outdoors in a partial shade/sun environment. I want great-looking pictures, but I’m not looking for anything to hang in a museum. If that’s the scenario, why choose Program over one of the scene modes? Because it gives me choices and control that none of the scene modes can deliver.
When to use Program (P) mode instead of the automatic scene modes
It’s graduation time and you’re ready to move on to a more advanced mode but not quite ready to jump in with both feet. When does Program mode come in handy?
- When shooting in a casual environment where quick adjustments are needed
- When you want more control over the ISO
- If you want to make corrections to the white balance
- When you want to change shutter speeds or the aperture to achieve a specific result
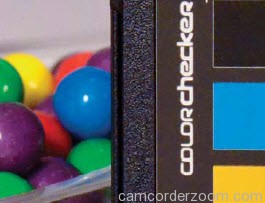
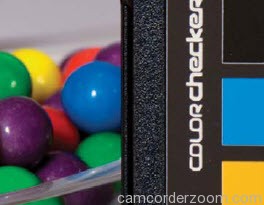
Let’s go back to our picnic scenario. As I said, the light is moving from deep shadow to bright sunlight, which means that the camera is trying to balance our three photo factors (ISO, aperture, and shutter speed) to make a good exposure. We know that Auto ISO is generally not what we want except when in shooting in Auto mode, so we have already turned that feature off (you did turn it off, didn’t you?). Well, in Program mode, you can choose which ISO you would like the camera to base its exposure on. The lower the ISO number, the better the quality of photographs, but the less light sensitive the camera becomes. It’s a balancing act, with the main goal always being to keep the ISO as low as possible—too low an ISO, and we will get camera shake in our images from a long shutter speed; too high an ISO,
and we will have an unacceptable amount of digital noise (Figures 4.2 and 4.3). For now, let’s go ahead and select ISO 400 so that we provide enough sensitivity for those shadows while allowing the camera to use shutter speeds that are fast enough to stop motion.
Starting points for ISO selection
Many years ago camera manufacturers were racing to create cameras with more megapixels. Today the digital race is all about higher ISO. Photographers want to be able to shoot in lower light conditions without the risk of digital noise. There is a lot of discussion concerning ISO in this and other chapters, but it might be helpful if you know where your starting points should be for your ISO settings. The first thing you should always try to do is use the lowest possible ISO setting. Your D7000 has a good working range of 100–6400. That being said, here are good starting points for your ISO settings:
- 100: Bright, sunny day
- 200: Hazy or outdoor shade on a sunny day
- 400: Indoor lighting at night or cloudy conditions outside
- 800: Late night, low-light conditions or sports arenas at night
- 1600: Very low light; possibly candlelight or events where no flash is allowed
- 3200-6400: Extreme low light (some digital noise will be present; however, less than ever before)
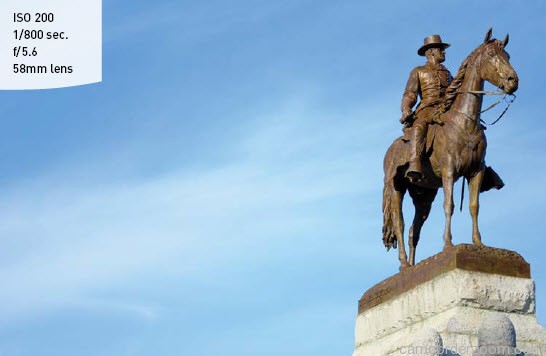
With the ISO selected, we can now make use of the other controls built into Program mode. By rotating the Command dial, we now have the ability to shift the program settings. Remember, your camera is using the internal meter to pick what it deems suitable exposure values, but sometimes it doesn’t know what it’s looking at and how you want those values applied (Figures 4.4 and 4.5). With the program shift, you can influence what the shot will look like. Do you need faster shutter speeds in order to stop the action? Just turn the Command dial to the right. Do you want a smaller aperture so that you get a narrow depth of field? Turn the dial to the left until you get the desired aperture. The camera shifts the shutter speed and aperture accordingly to get a proper exposure.
You will also notice that a small star will appear above the letter P in the viewfinder and the rear display if you rotate the Command dial. This star is an indication that you modified the exposure from the one the camera chose. To go back to the default Program exposure, simply turn the dial until the star goes away or switch to a different mode and then back to Program mode again.
Let’s set up the camera for Program mode and see how we can make all of this come together.
Setting up and shooting in Program mode
- Turn your camera on and then turn the Command dial to align the P with the indicator line.
- Select your ISO by pressing and holding the ISO button on the back left of the camera while rotating the main Command dial with your thumb.
- The ISO will appear on the top display. Choose your desired ISO, and release the ISO button on the left to lock in the change.
- Point the camera at your subject and then activate the camera meter by depressing the shutter button halfway.
- View the exposure information in the bottom of the viewfinder or by looking at the display panel on the back of the camera.
- While the meter is activated, use your thumb to roll the Command dial left and right to see the changed exposure values.
- Select the exposure that is right for you and start clicking.