


The Aperture Priority mode, or Av (“Aperture Value”), is where you choose the aperture and the camera selects the shutter speed—basically the reverse of the Tv mode. This is a very popular setting for many photographers since it offers the most creative control over depth of fi eld (how much of your image appears in focus). This is my favorite setting when I’m not shooting in the Manual mode, and I have a feeling that you will fi nd it just as useful.
The Av mode allows the camera to select the shutter speed. When you use a large aperture, you will end up with a faster shutter speed, and since a smaller aperture allows less light in through the lens, the camera will give a slower shutter speed to compensate. Once you have a solid understanding of how aperture and shutter speed work together, you will have taken a giant leap toward gaining complete control over your photography.
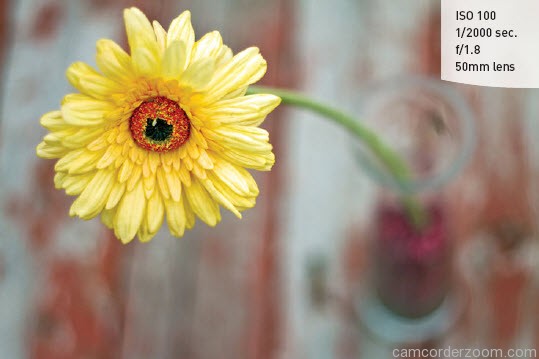
The greatest benefi t of using the Av mode is that the photographer can control the depth of fi eld in the image. Photographing something with a large aperture will decrease the depth of fi eld and blur the background, while a small aperture will increase the depth of fi eld so that more of the image is in focus (Figures 3.7 and 3.8).

WHEN TO USE APERTURE PRIORITY (AV) MODE
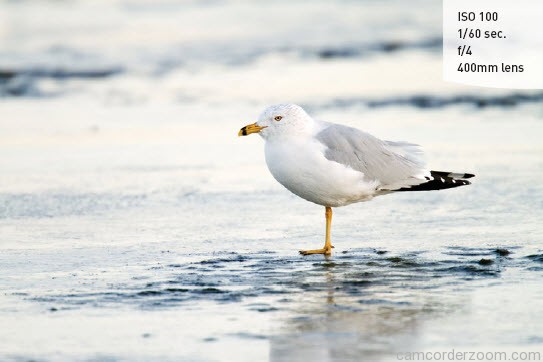
- When shooting portraits or wildlife (Figure 3.9)
- When shooting most landscape photography (Figure 3.10)
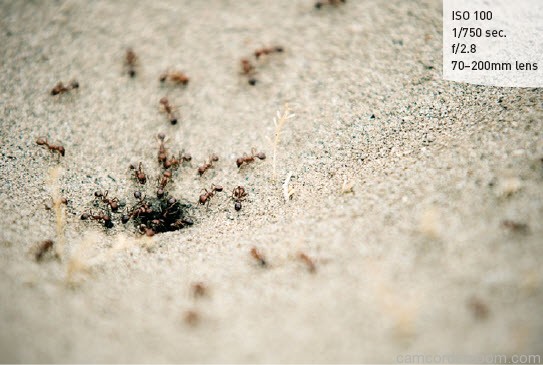
- When shooting macro, or close-up, photography (Figure 3.11)
It’s important to note that because the aperture is physically located inside the lens (not the camera), your lens will determine how large an opening you can use. Lenses with a large maximum aperture are considered “fast” lenses, and tend to be much more expensive. Canon’s fastest glass goes to an f-stop of 1.2, which allows you to shoot at faster shutter speeds in lower light situations. The largest aperture available for the majority of lenses on the market ranges from f/2.8 to f/4, which still allows a lot of light through to the sensor. The lens I use with my 7D for most of my work will only go to f/4, but I tend to work in brighter, more controlled lighting situations. Photographers who shoot weddings or events with uncontrollable lighting generally fi nd that they need faster lenses with an opening of f/2.8 or larger.
SETTING UP AND SHOOTING IN AV MODE
- Turn your camera on and then turn the Mode dial to align the Av with the indicator line.
- Select your ISO by pressing the ISO button on the top of the camera and then turning the Main dial (the ISO selection will appear in the top LCD Panel).
- Point the camera at your subject and then activate the camera meter by depressing the Shutter button halfway.
- View the exposure information in the bottom area of the viewfi nder or by looking at the top display panel.
- While the meter is activated, use your index fi nger to roll the Main dial left and right to see the changed exposure values. Roll the dial to the right for a smaller aperture (higher f-stop number) and to the left for a larger aperture (smaller f-stop number).
F-STOPS AND APERTURE
As discussed earlier, the numeric value of your lens aperture is described as an f-stop. The f-stop is one of those old photography terms that, technically, relates to the focal length of the lens (for example, 200mm) divided by the effective aperture diameter. These measurements are defined as “stops” and work incrementally with your shutter speed to determine proper exposure. Older camera lenses used one-stop increments to assist in exposure adjustments, such as 1.4, 2, 2.8, 4, 5.6, 8, 11, 16, and 22. Each stop represents about half
as much light entering the lens iris as the larger stop before it. Today, most lenses don’t have f-stop markings since all adjustments to this setting are performed via the camera’s electronics. The stops are also now typically divided into 1/3-stop increments to allow much finer adjustments to exposures, as well as to match the incremental values of your camera’s ISO settings, which are also adjusted in 1/3-stop increments.
ZOOM LENSES AND MAXIMUM APERTURES
Some zoom lenses (like the 18–55mm kit lens) have a variable maximum aperture. This means that the largest opening will change depending on the zoom setting. In the example of the 18–55mm zoom the lens has a maximum aperture of f/3.5 at 18mm and only f/5.6
when the lens is zoomed out to 55mm.
EXPOSURE COMPENSATION
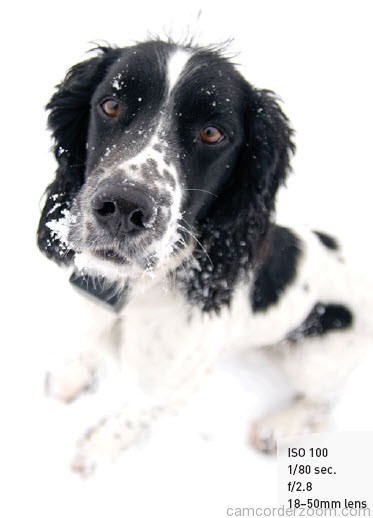
One of my favorite features of Canon cameras is that they allow you to change the exposure compensation very quickly using the Quick Control dial on the back of your camera. Exposure compensation is a way to trick the camera into thinking that there is more or less light coming through the lens than its light meter actually reads. This meter wants to balance the exposure so that it is equal to a neutral gray shade. For example, if you were to photograph in an all-white environment, such as in the snow, your camera would want to make all of the white areas look gray and your image would end up dark and underexposed. You can compensate for this by telling the camera to overexpose the image so that your white snow will look white in your photograph (Figure 3.12).
SETTING EXPOSURE COMPENSATION
- On the back of your camera, make sure that the Quick Control Dial switch is pushed all the way to the left.
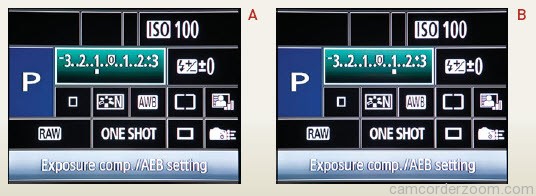
- Use your thumb to scroll the Quick Control dial to the left or right. Moving the dial to the left will tell your camera to underexpose the image (A), and moving it to the right will tell it to overexpose the image (B).

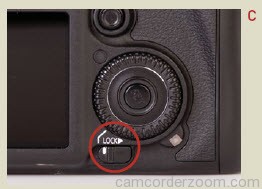
- This setting will stay in place until you change it back. If you want to lock it in to prevent further changes, then set the Quick Control Dial switch to the right (C).

Using the Quick Control dial to change your exposure compensation will expand the flexibility of using the P, Tv, and Av modes on your camera so that you won’t always have to rely on the camera to make the final decision.