


When shooting with your G12, you have a choice of two image formats that your camera will use to store the pictures on the memory card. JPEG is probably the format most familiar to anyone who has been using a digital camera.
As I mentioned in Chapter 1, JPEG is not actually an image format. It is a compression standard, and compression is where things go bad. When you have your camera set to JPEG—whether it is the large, medium, or small sizes—you are telling the camera to process the image and then throw away enough image data to make it shrink into a smaller space. In doing so, you give up subtle image details that you can never get back in post-processing. That is an awfully simplified statement, but still fairly accurate.
There is nothing wrong with JPEG if you are taking casual shots. JPEG files are ready to use, right out of the camera. Why go through the process of adjusting RAW images of the kids opening presents when you’re just going to email them to Grandma? However, if you care about having complete creative control over all of your image data—as opposed to what a compression algorithm thinks is important—JPEG may entail too many compromises.
So what does RAW have to offer?
First and foremost, RAW images are not compressed. (Some cameras have a compressed RAW format, but it is lossless compression, which means there is no loss of actual image data.) Note that RAW image files require you to perform post-processing on your photographs. This is not only necessary; it’s the reason most photographers use it.
RAW images have a greater dynamic range than JPEG-processed images. You can recover image detail in the highlights and shadows that just aren’t available in JPEG-processed images.
There is also more color information in a RAW image, because it is a 14-bit image; that means it contains more color information than a JPEG, which is almost always an 8-bit image. More color information means more to work with and smoother changes between tones—kind of like the difference between performing surgery with a scalpel as opposed to a butcher’s knife. They’ll both get the job done, but one will do less damage.
Regarding sharpening, a RAW image offers more control because you are the one who is applying the sharpening according to the effect you want to achieve. Once again, JPEG processing applies a standard amount of sharpening that you cannot change after the fact. Once it is done, it’s done.
Finally, and most importantly, a RAW file is your negative. No matter what you do to it, you won’t change it unless you save your file in a different format. This means you can come back to that RAW file later and try different processing settings to achieve differing results and never harm the original image. By comparison, if you make a change to your JPEG and accidentally save the file, guess what? You have a new original file, and you will never get back to that first image. That alone should make you sit up and take notice.
Image resolution
When discussing digital cameras, image resolution is often used to describe pixel resolution, or the number of pixels used to make an image. This can be displayed as a dimension such as 3648 x 2736. This is the physical number of pixels in width and height of the image sensor. Resolution can also be referred to in megapixels (MP) such as 10 MP. This number represents the number of total pixels on the sensor and is commonly used to describe the amount of image data that a digital camera can capture.
Advice for new RAW shooters
Don’t give up on shooting RAW just because it means more work. Hey, if it takes up more space on your card, buy bigger cards or more smaller ones. Will it take more time to download? Yes, but good things come to those who wait. Don’t worry about needing to purchase expensive software to work with your RAW files; you already own a program that will allow you to work with your RAW files. Canon’s Digital Photo Professional software comes bundled in the box with your camera and gives you the ability to work directly on the RAW files and then output the enhanced results.
Now, after trying my best to convince you to shoot in RAW, my recommendation going forward is to shoot in JPEG mode while you are using this book. This will allow you to quickly review your images and study the effects of future lessons. Once you’re comfortable with all of the camera features, you should switch to shooting in RAW mode so that you can start gaining more creative control over your image processing. After all, you took the photograph—shouldn’t you be the one to decide how it looks in the end?
Selecting RAW + JPEG
Your camera has the added benefit of being able to write two files for each picture you take, one in RAW and one in JPEG. This can be useful if you need a quick version to email but want a higher-quality version for more advanced processing.
Note that using both formats requires more space on the memory card. I recommend you use only one format or the other unless you have a specific need to shoot both.
Setting Raw + JPEG Shooting Mode
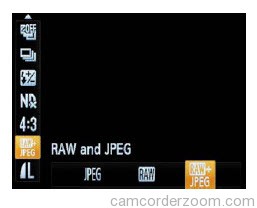
- Press the Function/Set button.
- Press the Down button or use the Control dial to highlight the Image Type menu item (which probably appears as
JPEG). - Press the Left or Right button to select the RAW + JPEG option.
- Press the Function/Set button to lock in your changes.