If you are upgrading from a digital point-and-shoot camera to the 7D, then you are already familiar with the JPEG fi le format. With DSLR cameras you also have the option of using the RAW format.
Let’s start with the JPEG fi le format. JPEG stands for Joint Photographic Experts Group. It was developed as a method of shrinking digital images in order to reduce large fi le sizes while retaining the original information. (Technically, JPEG is a mathematical equation for compressing a fi le format, but we’ll refer to it as a fi le format to keep things simple.) Your camera will embed all information into the photograph at the time of exposure. When you shoot in JPEG you have smaller fi le sizes, but that also means that each image has less information and lower quality, and making any extreme enhancements or edits to the image could degrade the image quality even more. However, using JPEG you can fi t many more images on your memory card, and the images will write to the card faster, which can make this type of fi le format desirable to many wedding and sports photographers.
RAW fi les, on the other hand, retain much more information than JPEG fi les, are not compressed, and offer a lot more “wiggle room” during your editing process (things like exposure and white balance can easily be adjusted without extreme loss of image quality). The downside to this format is that your fi le sizes will be much larger, and you won’t be able to fi t as many images on your memory card as you could using JPEG. You’ll also need to have a good understanding of photo editing, along with the corresponding software, to edit and share your images.
The 7D has several options for shooting modes. You have the choice to shoot in JPEG only, RAW only, or a combination of the two. If you are new to digital photography and don’t know much about shooting RAW and using sophisticated editing software, I recommend you stick with JPEG for now. If you aren’t sure what you want to do, and you happen to have a lot of card space, then you can always shoot in both RAW and JPEG at the same time. But for now let’s focus on setting up your camera to shoot in JPEG.
When shooting in JPEG format, you need to make some decisions that will determine the fi le size and quality of your images. There are three different sizes—Large, Medium, and Small—which indicate the actual physical size of your image in pixels. When picking the quality setting, you have two choices: Fine (high quality) and Normal (lower or normal quality). My recommendation, if you prefer to shoot in JPEG, is to select the highest image size and quality setting—Large size and Fine quality. It’s always best to start with the highest-quality image possible, right?
SETTING THE JPEG IMAGE QUALITY
- Turn the camera on.
- Press the Menu button on the back of the camera to bring up the menu list.
- Use the Multi-Controller to select the far-left menu tab.
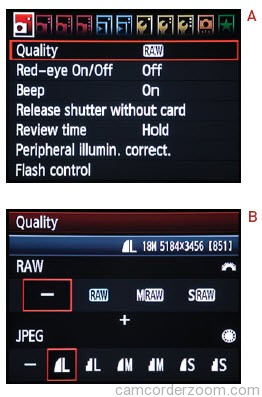
- At the top of this menu tab, locate the Quality option (A).
- Press the Set button to bring up the Quality options screen.
- Use the Main dial to select your RAW quality; you will move the dial all the way to the left to shoot only in the JPEG format.
- Use the Quick Control dial to select the fi rst L on the far left (this will render an 18-megapixel image with a dimension of 5184 pixels by 3456 pixels) (B).
- Press the Set button to lock in this change.
As you will see when scrolling through the quality settings, the higher the quality, the fewer pictures you will be able to fi t on your card. If you have a 1-GB memory card, the quality setting we have selected will allow you to shoot about 147 photographs before you fi ll it. Always try to choose quality over quantity. Your pictures will be the better for it.
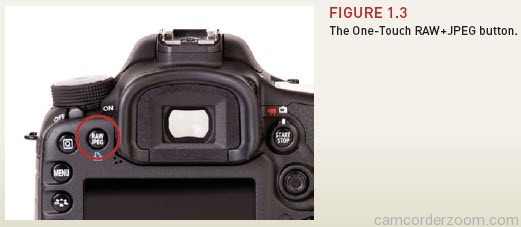
ONE-TOUCH RAW+JPEG BUTTON
If your image quality is set to shoot only in RAW or JPEG quality, you have the option of quickly shooting in RAW+JPEG quality mode for a single image by using the One-Touch RAW+JPEG button (Figure 1.3). If you are shooting in JPEG and you decide that your next photo could use some additional processing and want to shoot it in RAW, press the RAW/ JPEG button on the top-left part of the back of your camera and take a photo. You will then have both a RAW and a JPEG file of the same image. Once you take a photo, this button reverts to its previous setting.