


Your new D7000 has a number of image quality settings to choose from, and depending on your needs, you can adjust them accordingly.
This is probably one of the most important setting adjustments you can make. Most professional photographers shoot using RAW file format because it gives them the greatest control over their images. Now, if RAW is a completely new term for you and you have no experience in post-processing applications like Adobe’s Lightroom or Apple’s Aperture, then I recommend holding off on selecting this setting for now.
If you’re familiar with RAW, then I highly suggest you select that option now.
For non-RAW shooters we will be focusing in on the JPEG option. JPEG is a format that has been around since 1994 and is widely accepted. Most of your photos that are e-mailed or uploaded to social network sites like Facebook are JPEG images. Moreover, most printing services such as Walgreens, Kodak, Shutterfly, and Mpix use JPEG.
The JPEG file format compresses your image before final storage on your memory card, meaning the camera, not you, is applying all of the image processing first. Image processing involves such factors as sharpening, color adjustment, contrast adjustment, noise reduction, and so on. Many photographers prefer to use the RAW file format to get greater control over the image processing. We will take a closer look at this in Chapter 2, but for now let’s just make sure that we are using the bestquality JPEG possible.
The D7000 has nine settings for the JPEG format. There are three settings each for Large, Medium, and Small image sizes. These settings (Basic, Normal, and Fine) represent image compression. The Large, Medium, and Small settings determine
the actual physical size of your image in pixels. Let’s work with the highest-quality setting possible.
Setting the image quality
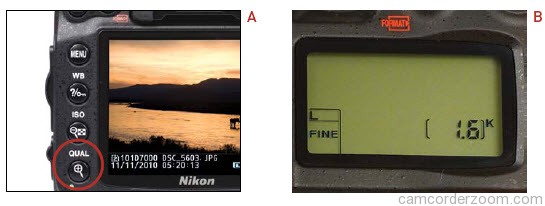
- Press and hold the Qual button on the bottom left of the camera while rotating the main Command dial to select the Fine image quality setting. You can view the changes on the LCD screen on the back or the control panel on the top right of the camera (A).
- Then, while still holding down the Qual button on the left, rotate the Subcommand dial with your right finger to choose the file setting Large, which selects the largest image size available.
- Release the Qual button when you have made your selection (B).
- If you’ve set up your camera properly it should read L Fine in the control panel (the LCD on the top of the camera).
As you will see when scrolling through the quality settings, the higher the quality, the fewer pictures you will be able to fit on your card. If you have an 8 GB memory card, the quality setting we have selected will allow you to shoot about 813 photographs before you fill up your card. I always try to choose quality over quantity.