


The 7D gives you the option to shoot and save your images to your memory card in RAW, JPEG, or both. Most people are already familiar with JPEG since it’s one of the most common fi le formats for anyone using a digital camera.
You may want to set your camera to JPEG and start shooting, never bothering with the other settings. After all, a JPEG is a very simple fi le to work with! It’s ready to go right out of the camera and you can store a lot more JPEG fi les on your memory card than you can RAW fi les. JPEG will also write to the card much faster, making it a good choice for photographers who do a lot of high-speed photography (such as sports photographers or photojournalists). So what’s the drawback of JPEG? There’s really nothing wrong with it if you can create your photos in-camera exactly how you want
them to look (proper exposure, white balance, and so on).
It is a compression standard, and compression is where things go bad. When you have your camera set to JPEG, you are telling the camera to process the image however it sees fi t and then throw away enough image data to make it shrink into a smaller space.In doing so, you give up subtle image details that you will never get back in postprocessing.
SO WHAT DOES RAW HAVE TO OFFER?
The RAW format is an uncompressed fi le that stores as much data as it can possibly collect from each image you take. Unlike JPEG, it is lossless compression, which means that it loses no image data when it writes to the memory card. Photographing with the RAW format means that you have a lot of room to edit the photo, but it also requires the use of software in order for you to share or print the image.
RAW images have a greater dynamic range than JPEG-processed images. This means that you can recover image detail in the highlights and shadows that just isn’t available in JPEGs.
There’s more color information in a RAW image because it is a 14-bit image, meaning it contains more color information than a JPEG, which is almost always an 8-bit image. More color information means more to work with and smoother changes between tones, and it will preserve the quality of your image while you edit.
Regarding sharpening, a RAW image offers more control because you are the one applying the sharpening according to the effect you want to achieve. Once again, JPEG processing applies a standard amount of sharpening that you cannot change after the fact. Once it is done, it’s done.
Finally, and most importantly, a RAW fi le is your negative. No matter what you do to it, you won’t change it unless you save your fi le in a different format. This means that you can come back to that RAW fi le later and try different processing settings to achieve differing results and never harm the original image. By comparison, if you make a change to your JPEG and accidentally save the fi le, guess what? You have a new original fi le, and you will never get back to that fi rst image. That alone should make you sit up and take notice.
ADVICE FOR NEW RAW SHOOTERS
If you are used to only using the JPEG format, moving to RAW is a big step but a very worthwhile one. Using the RAW format means more work at your computer, but don’t give up just because it takes a few extra minutes to process each image. It will also take up more space on your CF card, but that’s an easy fi x—go buy more cards, or get them in larger sizes (I like to use 16 GB CF cards when I shoot with my 7D). Also, don’t worry about needing to purchase expensive software to work with your RAW fi les; you already own a program that allows you to work with them. Canon’s Digital Photo Professional software comes bundled in the box with your camera and gives you the ability to work directly on the RAW fi les and then output the enhanced results.
SELECTING A RAW FORMAT
The 7D has the ability to capture different-sized RAW fi les. This means you can now have all of the benefi ts of a RAW fi le in a smaller image size. The standard RAW fi le uses the full sensor resolution of 5184 x 3456 pixels. If you want the fl exibility and power of using the RAW format but don’t necessarily need an image that large, you can select one of the smaller RAW fi les: mRAW (3888 x 2592) or sRAW (2592 x 1728). These smaller RAW fi les will also take up less space on your memory card, allowing you to shoot more images.
IMAGE RESOLUTION
When discussing digital cameras, image resolution is often used to describe pixel resolution, or the number of pixels used to make an image. This can be displayed as a dimension such as 5184 × 3456. This is the physical number of pixels in width and height of the image sensor. Resolution can also be referred to in megapixels (MP), such as 18 MP. This number
represents the number of total pixels on the sensor and is commonly used to describe the amount of image data that a digital camera can capture.
SELECTING YOUR IMAGE QUALITY SETTING

- Press the Menu button and use the Main dial to select the fi rst shooting menu tab.
- Use the Quick Control dial to highlight the Quality setting and press the Set button to enter the Quality setting page (A).
- Use the Main dial to change the RAW setting and the Quick Control dial to change the JPEG setting (B).
- Press the Menu button to lock in your changes.
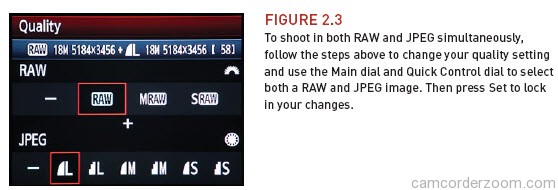
If you are uncomfortable shooting in RAW, that is perfectly OK. My recommendation is to use what works best for your photography, but don’t be afraid to try new things. One great feature of the 7D is that you don’t have to pick one or the other—the camera gives you the option to shoot in both RAW and JPEG simultaneously (Figure 2.3). This will take up a signifi cant amount of space on your memory card, but it’s a good way to transition over, or to just give RAW a chance.
CROP SENSOR VS. FULL FRAME
The 7D is what we consider a “crop sensor” camera. Many digital SLR cameras have one of two different types of sensors: full-frame or crop sensor. The sensor is the area in the camera that converts the image you see through the viewfinder into the digital file that writes to the memory card. All full-frame sensors have an area of 36 × 24 mm (the same size as a 35mm negative). The crop sensor on the 7D is slightly smaller at 22.3 × 14.9 mm (Figure 2.4). This will increase your focal length by a crop-factor of 1.6, so if you have a 50mm lens attached to your 7D, then you are actually seeing the equivalent of 80mm when you look through the viewfinder.
