


The Creative Zone is a group of shooting modes that gives the user (that’s you!) much more control over the camera settings. It’s good to have a basic understanding of how aperture, shutter speed, and ISO work together to create a balanced exposure when using any of these modes (see Chapter 2 for more information). The remaining chapters in this book will focus on using the modes in the Creative Zone, so I highly recommend familiarizing yourself with these shooting modes and settings so that you can take full control of the overall quality of your images.
P: PROGRAM MODE
Next up on the dial is the Program mode (P). This mode is similar to the Full and Creative Auto modes in that it gives the camera control over some of the settings, but it leaves the rest of the decisions to the photographer.
So how do the Auto modes and the Program mode differ? It’s actually quite simple. In Program mode, the only settings that the camera determines are shutter speed and aperture. You choose the ISO, white balance, focus point, and so on, so you will still have a lot of control over the quality of your images. The camera is just making some of the last, yet still very important, decisions for you.
WHEN TO USE PROGRAM (P) MODE INSTEAD OF THE AUTOMATIC MODES
- When shooting in a casual environment where quick adjustments are needed
- When you want control over the ISO
- If you want to make corrections to the white balance
Now, just because the camera chooses a starting point with an aperture and shutter speed doesn’t mean that you are stuck with its first choice. The Canon 60D allows you to adjust the aperture and shutter speed on the fly while maintaining the same amount of light that is coming through the lens. if the camera wants the settings to be 1/250 of a second (shutter speed) at f/5.6 (aperture), you can turn the Main dial to a reciprocal exposure of 1/60 of a second at f/11. You will get the same exposure in your image, but your depth of field will vary because of the different aperture settings.
The key to adjusting your exposure in Program mode is understanding what you want the overall image to look like. If you are photographing a fast-moving subject and need to freeze the action, then you will turn the Main dial to the right to be sure that your shutter speed is fast enough to capture the movement. This also increases the size of the aperture, which can result in a blurred background, or shallow depth of field. Turning the Main dial to the left will do just the opposite—it will slow your shutter speed, possibly increasing the likelihood of motion in the image, and it will shrink the size of the aperture, which will result in a more focused image, or greater
depth of field.
Let’s set up the camera for Program mode and see how we can make all of this come together.
SETTING UP AND SHOOTING IN PROGRAM MODE
- Turn your camera on and then turn the Mode dial to align the P with the indicator line.
- Make sure that your ISO, white balance, and focus point are set appropriately (this is where you get to make the decisions!).
- Point the camera at your subject and then activate the camera meter by depressing the Shutter button halfway.
- View the exposure information while looking through the viewfinder (underneath the focusing screen) or at the LCD Panel on the top of the camera.
- To alter the shutter speed and aperture settings, use your index finger to roll the Main dial left and right to see the changed exposure values.
- Select the exposure that is right for you and start shooting.
STARTING POINTS FOR ISO SELECTION
There is a lot of discussion concerning ISO in this and other chapters, but it might be helpful if you know where your starting points should be for your ISO settings. The first thing you should always try to do is use the lowest possible ISO setting. That said, here are good starting points for your ISO settings:
- 100: Bright sunny day
- 200: Hazy or outdoor shade on a sunny day
- 400: Indoor lighting at night or cloudy conditions outside
- 800: Late night, low-light conditions, or sporting arenas at night
TV: SHUTTER PRIORITY MODE
The Shutter Priority mode, referred to on your Mode dial as Tv (which stands for “Time Value”), is where you select the shutter speed and the camera adjusts the aperture accordingly. Use this mode to push yourself toward the more advanced modes with your camera. This will allow you an enormous amount of control with your final image.
Before we go any further, let me briefly explain the mechanics of the camera shutter. The shutter is like a curtain that opens and closes to allow light to hit the sensor. The speed is calculated in seconds and fractions of a second (which is what you will likely use most often), and the longer the shutter stays open, the more light will reach the sensor. Using a very fast shutter speed is ideal for capturing fast-moving subjects (think of a football player jumping in the air to receive a pass), while a slow shutter speed can show movement in an image (like creating a soft effect on the water in a flowing stream or waterfall). These settings are offset by a larger aperture for fast shutter speeds and a smaller aperture for slow shutter speeds.
It’s important to understand that if the shutter speed gets too low, you won’t be able to handhold the camera to take the photo. Doing so might introduce “camera shake” in your image, which often makes an image appear out of focus. A good rule of thumb is to keep your shutter speed the same as your lens’s focal length. For example, if you are using a 200mm lens, try to keep the slowest handheld shutter
speed no slower than 1/200 of a second. Because the 60D has a 1.6 crop factor, the number might be slightly off, but sticking to that basic principle will help you keep your images sharp and free of camera shake.
WHEN TO USE SHUTTER PRIORITY (TV) MODE
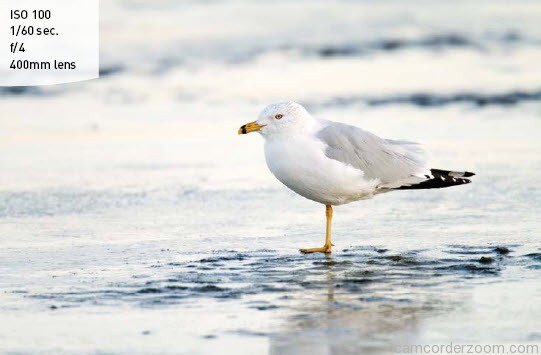
- When working with fast-moving subjects where you want to freeze the action (Figure 3.3)
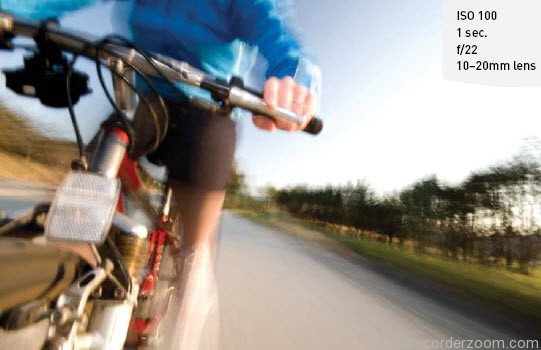
- When you want to emphasize movement in your subject with motion blur (Figure 3.4)
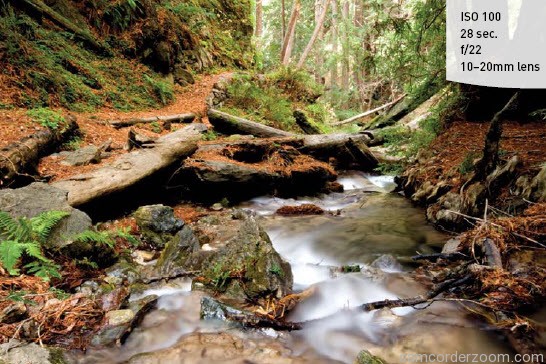
- When you want to create that silky-looking water in a waterfall or stream (Figure 3.5)

As you can see, the subject of your photo usually determines whether or not you will use Tv mode. It’s important that you be able to visualize the result of using a particular shutter speed. The great thing about shooting with digital cameras is that you get instant feedback by checking your shot on the LCD screen. But what if you only have one chance to catch the shot? Such is often the case when shooting sporting events. It’s not like you can go ask the quarterback to throw that winning touchdown pass again because your last shot was blurry from a slow shutter speed. This is why it’s important to know what those speeds represent in terms of their capabilities to stop the action and deliver a blur-free shot.
First, let’s examine just how much control you have over the shutter speeds. The 60D has a shutter speed range from 1/8000 of a second all the way up to 30 seconds. With that much latitude, you should have enough control to capture almost any subject. The other thing to think about is that Tv mode is considered a “semiautomatic” mode. This means that you are taking control over one aspect of the total exposure while the camera handles the other. In this instance, you are controlling the shutter speed, and the camera is controlling the aperture. This is important, because there will be times that you want to use a particular shutter speed, but your lens won’t be able to accommodate your request.
For example, you might encounter this problem when shooting in low-light situations. If you are shooting a fast-moving subject that will blur at a shutter speed slower than 1/125 of a second but your lens’s largest aperture is f/3.5, you might find that the aperture display in your viewfinder and on the top LCD Panel will begin to blink. This is your warning that there won’t be enough light available for the shot—
due to the limitations of the lens—so your picture will be underexposed.
Another case where you might run into this situation is when you are shooting moving water. To get that look of silky, flowing water, it’s usually necessary to use a shutter speed of at least 1/15 of a second. If your waterfall is in full sunlight, you may get that blinking aperture display once again, because the lens you are using only stops down to f/22 at its smallest opening. In this instance, your camera is warning
you that you will be overexposing your image. There are workarounds for these problems, which we will discuss later, but it’s important to know that there can be limitations when using Tv mode.
SHUTTER SPEEDS
A slow shutter speed refers to leaving the shutter open for a long period of time—like 1/30 of a second or longer. A fast shutter speed means that the shutter is open for a very short period of time—like 1/250 of a second or less.
SETTING UP AND SHOOTING IN TV MODE
- Turn your camera on and then turn the Mode dial to align the Tv with the indicator line.
- Select your ISO by pressing the ISO button on the top of the camera and then turning the Main dial (the ISO selection will appear in the top LCD Panel).
- Point the camera at your subject and then activate the camera meter by depressing the Shutter button halfway.
- View the exposure information in the bottom area of the viewfinder or in the top LCD Panel.
- While the meter is activated, use your index finger to roll the Main dial left and right to see the changed exposure values. Roll the dial to the right for faster shutter speeds and to the left for slower speeds.
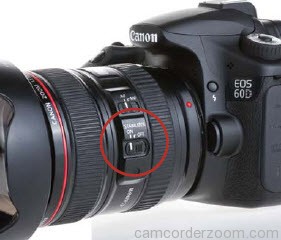
IMAGE STABILIZATION LENSES
Some Canon lenses come with a feature called Image Stabilization (IS) (Figure 3.6). It’s a mechanism that’s built directly into the lens and helps reduce motion blur due to camera shake when photographing at slower shutter speeds.
If you have this option on your lens, it’s a good idea to leave it turned on when doing any handheld photography. Because the IS mechanism in the lens moves when turned on, you’ll want to turn it off when using a tripod. It could introduce camera shake in your
images if the camera is perfectly still on a tripod, so it is typically recommended only for handheld photography.
AV: APERTURE PRIORITY MODE
The Aperture Priority mode, or Av (“Aperture Value”), is where you choose the aperture, and the camera selects the shutter speed—basically the reverse of the Tv mode. This is a very popular setting for many photographers, since it offers the most creative control over depth of field (how much of your image appears in focus). This is my favorite setting when I’m not shooting in the Manual mode, and I have a feeling that you will find it just as useful. I discussed the basics of how the aperture works, so you should know that a wide, or large, aperture (smaller number), equates to more light coming through the lens, and vice versa. The Av mode allows the camera to select the shutter speed. When you use a large aperture, you will end up with a faster shutter speed, and since a smaller aperture allows less light in through the lens, the camera will give a slower shutter speed to compensate. Once you have a solid understanding of how aperture and shutter speed work together, you will have taken a giant leap toward gaining complete control over your photography.
F-STOPS AND APERTURE
As discussed earlier, the numeric value of your lens aperture is described as an f-stop. The f-stop is one of those old photography terms that, technically, relates to the focal length of the lens (for example, 200mm) divided by the effective aperture diameter. These measurements are defined as “stops” and work incrementally with your shutter speed to determine proper exposure. Older camera lenses used one-stop increments to assist in exposure adjustments, such as 1.4, 2, 2.8, 4, 5.6, 8, 11, 16, and 22. Each stop represents about half as
much light entering the lens iris as the larger stop before it. Today, most lenses don’t have f-stop markings, since all adjustments to this setting are performed via the camera’s electronics. The stops are also now typically divided into 1/3-stop increments to allow much finer adjustments to exposures, as well as to match the incremental values of your camera’s ISO settings, which are also adjusted in 1/3-stop increments.
The greatest benefit of using the Av mode is that the photographer can control the depth of field in the image. Photographing something with a large aperture will decrease the depth of field and blur the background, while a small aperture will increase the depth of field so that more of the image is in focus (Figures 3.7 and 3.8).

WHEN TO USE APERTURE PRIORITY (AV) MODE
- When shooting portraits or wildlife (Figure 3.9)
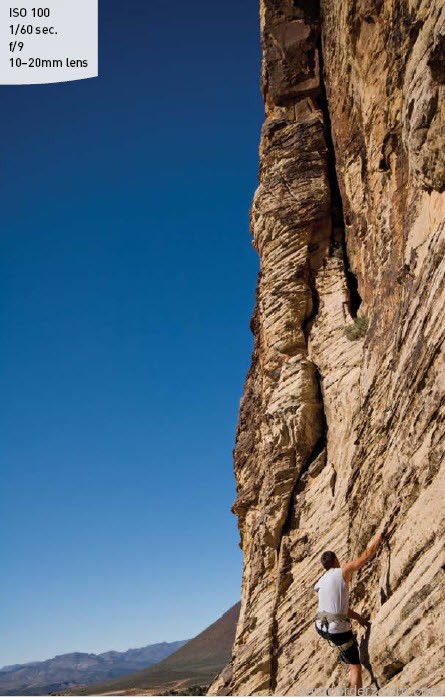
- When shooting most landscape photography (Figure 3.10)
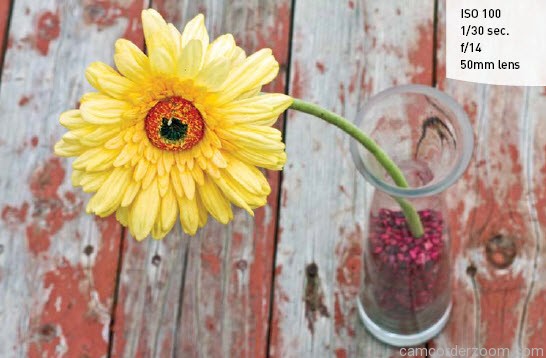
- When shooting macro, or close-up, photography (Figure 3.11)
It’s important to note that because the aperture is physically located inside the lens (not the camera), your lens will determine how large an opening you can use. Lenses with a large maximum aperture are considered “fast” lenses, and tend to be much more expensive. Canon’s fastest glass goes to an f-stop of 1.2, which allows you to shoot at faster shutter speeds in lower-light situations. The largest aperture available for the majority of lenses on the market ranges from f/2.8 to f/4, which still allows a lot of light through to the sensor. The lens I use with my 60D for most of my work will only go to f/4, but I tend to work in brighter, more controlled lighting situations. Photographers who shoot weddings or events with uncontrollable lighting generally find that they need faster lenses with an opening of f/2.8 or larger.

SETTING UP AND SHOOTING IN AV MODE
- Turn your camera on and then turn the Mode dial to align the Av with the indicator line.
- Select your ISO by pressing the ISO button on the top of the camera and then turning the Main dial (the ISO selection will appear in the top LCD Panel).
- Point the camera at your subject and then activate the camera meter by depressing the Shutter button halfway.
- View the exposure information in the bottom area of the viewfinder or in the top LCD Panel.
- While the meter is activated, use your index finger to roll the Main dial left and right to see the changed exposure values. Roll the dial to the right for a smaller aperture (higher f-stop number) and to the left for a larger aperture (smaller f-stop number).
ZOOM LENSES AND MAXIMUM APERTURES
Some zoom lenses (like the 18–55mm kit lens) have a variable maximum aperture. This means that the largest opening will change depending on the zoom setting. In the example of the 18–55mm zoom, the lens has a maximum aperture of f/3.5 at 18mm and only f/5.6 when the lens is zoomed out to 55mm.
EXPOSURE COMPENSATION
One of my favorite features of Canon cameras is that they allow you to change the exposure compensation very quickly using the Quick Control dial on the back of your camera. Exposure compensation is a way to trick the camera into thinking that there is more or
less light coming through the lens than its light meter actually reads. This meter wants to balance the exposure so that it is equal to a neutral gray shade. For example, if you were to photograph in an all-white environment, such as in the snow, your camera would want
to make all of the white areas look gray, and your image would end up dark and underexposed. You can compensate for this by telling the camera to overexpose the image so that your white snow will look white in your photograph (Figure 3.12).

SETTING EXPOSURE COMPENSATION
- If you have the Quick Control dial lock enabled, push the UNLOCK button on the back of the camera.
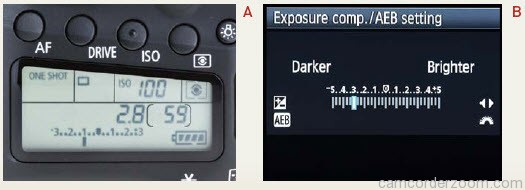
- Use your thumb to scroll the Quick Control dial to the left or right while watching the top LCD Panel (A). Moving the dial to the left will tell your camera to underexpose the image, and moving it to the right will tell it to overexpose the image. Note that you can also make these changes on the LCD Monitor by using the Quick Control screen (B).
- Using the Quick Control dial to change your exposure compensation will expand the flexibility of using the P, Tv, and Av modes on your camera so that you won’t always have to rely on the camera to make the final decision.
M: MANUAL MODE
Before cameras had shooting modes such as Aperture Priority, Program, and so on, all exposures were set manually. This means that the photographer chose all of the settings, and since both the ISO and white balance were already decided depending on the kind of film loaded into the camera, the photographer was only responsible for selecting the proper aperture and shutter speed. As technology advanced and automatic features were added to cameras, many photographers discovered new ways of capturing their images. However, the “old-fashioned” method of taking pictures was never set aside or forgotten. You will find that using the Manual (M) mode on the 60D will give you total control over your images.
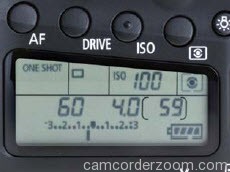
When shooting in Manual mode, you choose both the aperture and shutter speed, and the camera will do nothing other than give you its feedback through the internal light meter. You can view how the meter is reading a scene by looking in one of two places: the LCD on the top of the camera (Figure 3.13), or underneath the focusing frame while looking through the viewfinder. This meter is what the camera uses when shooting images in all other modes, and its goal is always to find the most balanced exposure. Sometimes, the light meter reads
the scene incorrectly or the photographer wants to have full control over the exposure, and in those scenarios using the Manual mode is the best choice.
WHEN TO USE MANUAL (M) MODE
- When learning how each exposure element interacts with the others
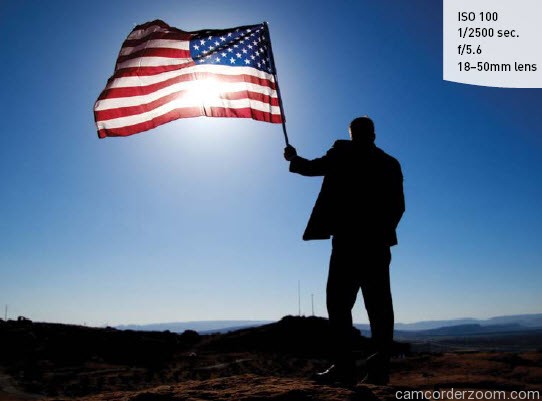
- When your environment is fooling your light meter, and you need to maintain a certain exposure setting, such as with a silhouette (Figure 3.14)
- When using an artificial light source, such as strobes or flashes, in a controlled environment (Figures 3.15 and 3.16)


I prefer to use the Manual mode when using strobes or any other type of controlled light source in an unchanging environment. I also use it when I have my camera on a tripod while photographing things such as food or landscapes. The great thing about Manual mode is that it can be used in any circumstance and can yield some amazing results if you know what you’re doing.
SETTING UP AND SHOOTING IN MANUAL MODE
- Turn your camera on and turn the Mode dial to align the M with the indicator line.
- Select your ISO by pressing the ISO button on the top of the camera and then turning the Main dial (the ISO selection will appear in the top LCD Panel).
- Point the camera at your subject and then activate the camera meter by depressing the Shutter button halfway.
- View the exposure information in the bottom area of the viewfinder or by looking at the display panel on top of the camera.
- While the meter is activated, use your index finger to roll the Main dial left and right to change your shutter speed value until the exposure mark is lined up with the zero mark. The exposure information is displayed by a scale with marks that run from –3 to +3 stops. The camera will meter a proper exposure when it is lined up with the arrow mark in the middle. As the indicator moves to the
left, it’s a sign that you’ll be underexposing (telling you that there is not enough light on the sensor to provide adequate exposure). Move the indicator to the right and you will be providing more exposure than the camera meter calls for. This is overexposure. - To set your exposure using the aperture, depress the Shutter button until the meter is activated. Then, using your thumb, scroll the Quick Control dial to change the aperture: clockwise for a smaller aperture (large f-stop number), and counterclockwise for a larger aperture (small f-stop number). (If you have the Quick Control dial lock enabled, you’ll need to press the UNLOCK button before making any changes to the aperture.)
B: BULB MODE
The Bulb (B) mode on your camera is another manual mode setting that gives you complete control over the shutter speed, but instead of
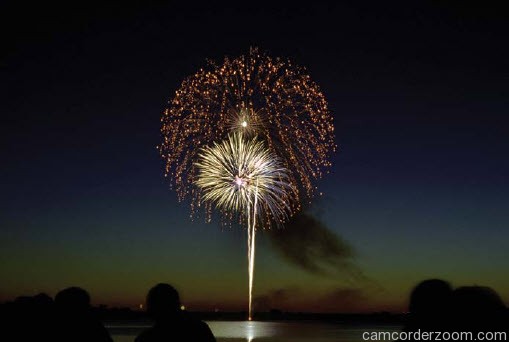
choosing a specific setting, you are able to leave the shutter open for an indefinite period of time. The word bulb comes from the early days of photography when camera shutters were pneumatically activated, meaning a bulb was pressed and the air from it was released through a tube that caused the shutter to open and close. It’s a mode that is typically used in dark environments to capture light that is sporadic
or changing, such as fireworks or star trails. It can be extremely useful in creating images that need very long shutter speeds.

When using this mode, it’s essential to use both a tripod and a cable release (Figure 3.17). A tripod will keep the camera steady while the
shutter is open, and a cable release will open and close the shutter without you having to push the button on the top of the camera,
reducing the likelihood of camera shake in your images.
WHEN TO USE BULB (B) MODE
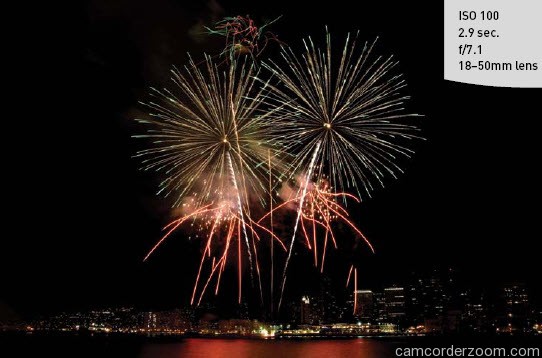
- When shooting fireworks displays (Figure 3.18)
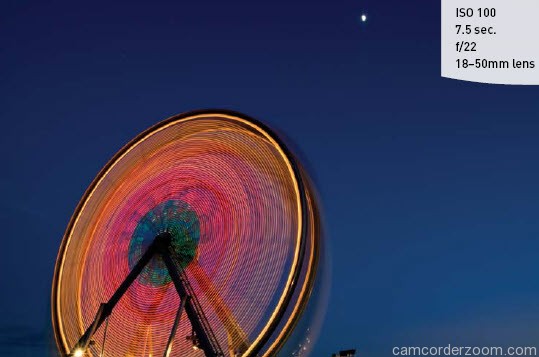
- When you want to capture trails of lights, such as stars or cars moving down a street at night (Figure 3.19)
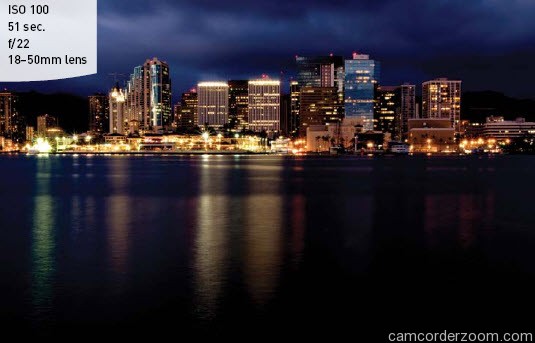
- When you want to photograph any image in a dark environment at a very small aperture (Figure 3.20)
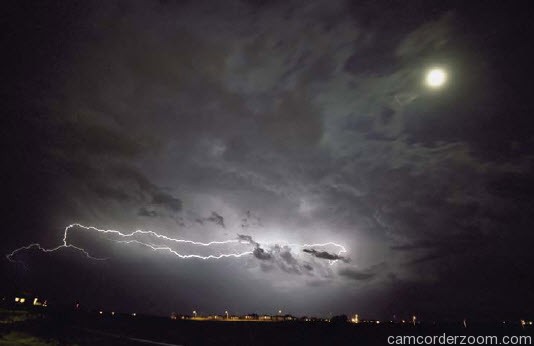
Using the Bulb mode can bring a lot of creativity into your photography, and there are really no limits to what you can create. The wonderful thing about this mode is that you are able to capture images that are so different from what we see with our eyes. When I lived in the Midwest, I used to chase storms and photograph lightning and was always amazed at the results (Figure 3.21). We see the bolts of light for only a split second, but by using the Bulb mode we can freeze the lightning and see more than we could with our eyes during the storm.
SETTING UP AND SHOOTING IN BULB MODE
- Set your camera on a sturdy tripod and attach a cable release to the Remote Control terminal on the side of your camera.
- Turn the Mode dial to align the B with the indicator line.
- Select your aperture by turning the Main dial.
- Select your ISO by pressing the ISO button on the top of the camera and then turning the Main dial (the ISO selection will appear in the top LCD Panel).
- Position the camera toward your subject and press the button on the cable release. Hold the button down until you are satisfied with your exposure, and then release the shutter.
- If you want an extremely long exposure (several minutes or hours), lock the cable release by sliding the button up, which will allow you to lock the shutter in place indefinitely. The only limitation to your exposure is the amount of life left in your battery.
C: CAMERA USER SETTING
The 60D allows you to customize a shooting mode with the Camera User setting (C). This is useful if you frequently find yourself shooting in the same environment with the same settings. It allows you to completely customize a shooting setting any way you like and then record those settings as a preset
One example of when you may want to use these settings is when shooting high-dynamic range images, also known as HDR (more information on this technique is in Chapter 5). It doesn’t matter where I am, what lens I’m using, or what time of day it is, I always use the same starting point. I set the ISO to 100, shoot in Av mode, set the drive mode to High-speed continuous shooting, and make sure that Auto Exposure Bracket mode is turned on. I can record all of these settings in one of the custom settings, and they will be ready any time
I want to photograph a series of images for HDR.
Another useful preset to create is one for using the Movie shooting mode. I like to have a good starting point for all of the movies I record, and I don’t want to make a silly mistake like forgetting to turn sound recording on, shooting at too high a shutter speed, or using the wrong movie-recording size. Setting up a preset and using a customized camera user setting will guarantee that I won’t make any of those mistakes. It also allows me to jump straight into movie shooting without having to think about my settings.
DIGITAL NOISE AND LONG EXPOSURES
One issue that arises when making extremely long exposures is that you are likely to introduce more digital noise into your images than with a normal exposure. This is one area in which film still has an advantage over digital (Figure 3.22). Digital noise due to long exposures is difficult to prevent, but there are some advanced ways to reduce its effect by using noise-reduction software while editing your images. You can also reduce the amount of noise in-camera by turning on the Long Exposure Noise Reduction setting in your 60D.
SETTING UP YOUR OWN CUSTOM SHOOTING MODES
- First, make all of the adjustments to the camera that you want in your custom shooting mode. For example, you might set the camera to Av mode, ISO 100, Daylight white balance, and RAW+JPEG image quality.
- Press the Menu button and use the Main dial to get to the third setup tab.
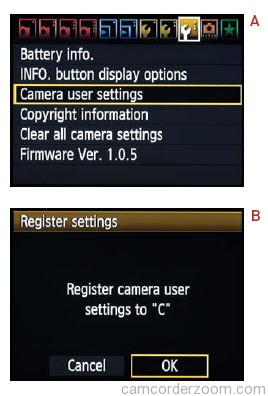
- Use the Quick Control dial to highlight the Camera User Settings option (A), and then press Set. Select Register and press Set again.
- Use the Quick Control dial to select OK (B), and then press Set one last time.
- When you want to use a setting, just rotate the Mode dial to the Camera User setting mode and begin shooting.